From dev to admin: an easy Kubernetes privilege escalation you should be aware of — the attack

When one says “security”, usually the most of us (including me!) automatically think about authentication and authorization: unfortunately, above all in a containerized world, these are just two slices of a bigger cake!
In this post, we will see how easily a limited user (such as a developer) can escalate her privileges and become an admin of a cluster which has been set-up using kubeadmin.
This is the third post of a series, so let’s briefly summarize what we have done so far:
- in the first article, we have seen how to generate a TLS certificate for a new user (lancelot, member of the group of the “knights”) and store it into a Kubeconfig. In that post, I showed you how to locate the root certificate and the private key of the certification authority: we used those files to manually sign our CSR and get a valid certificate for lancelot.
- in the second article, we went a step forward and assigned lancelot permissions to read pod information (including logs) and work (CRUD) with deployments, but just within the namespace “round-table”. He can get node information as well. In that post, I stressed the fact that a new kubeadmin cluster ships with pre-configured ClusterRoles and ClusterRoleBindings, allowing a member of the group system:masters to work without any restrictions on the cluster.
lancelot is hence a limited user, having the permissions (edit deployments, read pod info) which are usually assigned to developers on dev/test clusters (hopefully not in production!). Since lancelot can edit workloads only within his namespace “round-table”, you may think our cluster is safe: unfortunately, this is not the case!
In the following, we will use Sir Lancelot’s limited account to steal the private key of the CA and then generate a new certificate for an user called dragon, which we will assign to the group system:masters.
The attack plan
Before we move on, let’s try to define an attack strategy!
A few things we know:
- The ca.key is the private key of the certification authority (ca). With this file, usually stored at a fixed path on master nodes, together with the root ca certificate (ca.crt), we can sign any CSR (exactly as we did in the first post of this series). The problem is, this file is only accessible to root users.
- Our user (lancelot) can edit deployments, but only within a given namespace (round-table). He can also read pod information, including their logs!
- A deplyoment consists of one or more pods, which in turn run containers. A container is a process on the host machine executing it.
- Always in the first post of this series, we have seen how Kubernetes makes use of a particular kind of volume, namely the hostPath, to mount the physical filesystem of the host within a pod. The pod for the kube-apiserver, for example, uses this technique extensively to mount (sensitive) files from the master node’s filesystem.
So, what about this plan?
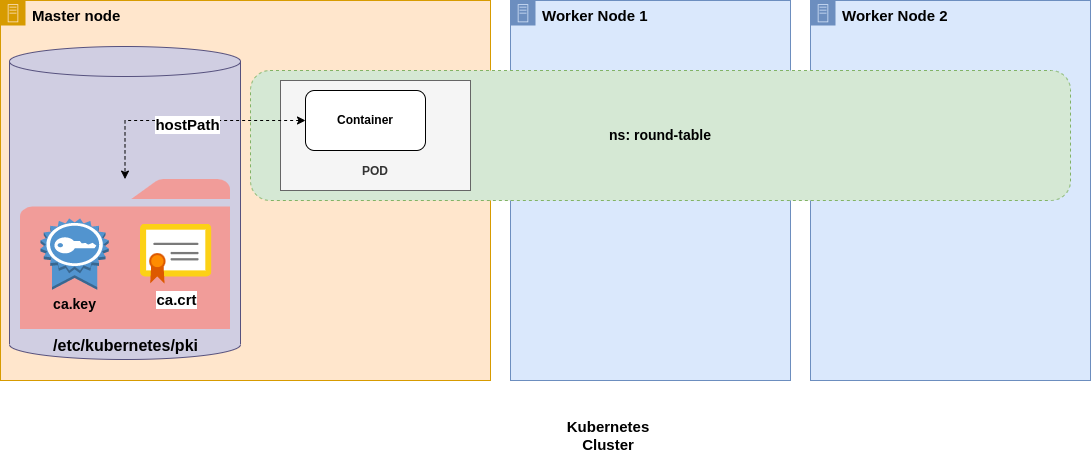
- We create a deployment and try to force k8s to start the pod on a master node, where the ca files reside.
- We mount the folder where we expect to find the ca files (/etc/kubernetes/pki) as an hostPath Volume for the pods of our deplyoment.
- Our pod’s container will be responsible for reading the content of those files and log them out. Since we can read pod’s logs, this will be enough to steal the files.
- We create a CSR for our dragon, member of the group system:masters and sign it using the ca.key and ca.crt we can read in the pod’s logs.
Schedule a pod on a given node
As you probably know, each time you request the API-Server to start a Pod (i.e. through a kubectl run command), the kube-scheduler, a control-plane process, will select the optimal node for running that pod. You can check this by describing the pod and looking for the related events (note: you can’t do this using lancelot’s credentials, as you need read permission for events):
kubectl describe pod <a-pod>
The scheduler’s effort is to find the “best matching” node for a Pod, so in general you cannot predict where your pod will run. Nevertheless, there are several options to constrain the scheduler to assign the pod to a particular node, the simplest of those being the nodeSelector.
nodeSelector
From the official doc:
nodeSelectoris the simplest recommended form of node selection constraint. (…) For the pod to be eligible to run on a node, the node must have each of the indicated key-value pairs as labels (it can have additional labels as well)
In other words, you can use nodeSelector to constraint a pod to be scheduled on a node having a given label.
At this point, it would be nice if there was a sort of standard label for master nodes which we could use in combination with nodeSelector to force the scheduler to assign our pod to such a node. Let’s check that:
kubectl get node <your-masternode> -o jsonpath=’{.metadata.labels}’ | jq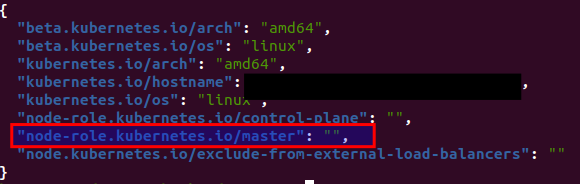
The label “node-role.kubernetes.io/master” looks exactly like what we’re looking for!
This snippet should create a deployment with just 1 replica of a pod running a nginx container, and that pod should be scheduled on a master node:
Let’s check what happened:
kubectl get pod -owide
It looks like there was a problem: our pod is in status pending! If we describe it using our lancelot account, we cannot see any events (as the user cannot read events):

Nevertheless, since lancelot has read permissions for pods, we can for example look at the status of the pod using this command:
kubectl get po nginx-... -o jsonpath='{.status.conditions}' | jq
The error message says:
1 node(s) had taint {node-role.kubernetes.io/master: }, that the pod didn’t tolerate, 2 node(s) didn’t match Pod’s node affinity/selector.In other words, we are on the right way: the nodeSelector forced the scheduler to filter out the 2 worker nodes, and the matching node (the master) couldn’t be used due to a taint which our pod didn’t tolerate. Wondering what does this mean? Keep reading! :)
Taints and tolerations

There are many ways to describe taints and tolerations. An easy one is the following:
- Imagine taints as a fence delimiting a VIP area in a disco club, where only members with a special invitation are allowed to enter;
- Imagine tolerations as the invitations to enter the VIP area;
The rationale for taints in k8s is to have a means to mark nodes which should allow only special workload, or nodes with special hardware. Taints can also be used for evicting running pods from a node.
The format is:
key=value:effectKey and value are arbitrary strings, whilst effect can be one of:
- NoSchedule: Pods without toleration for the taint won’t be scheduled on the node (this is exactly our case)
- NoExecute: Pods running on the tainted node, which don’t tolerate the taint, will be evicted from the node.
Tolerations come in two flavours:
- Equal operator: the toleration applies only if there is a perfect match with the key, value and effect of the taint:
tolerations:
- key: "key1"
  operator: "Equal"
  value: "value1"
effect: "NoSchedule"- Exists: the toleration applies if there is a match with the key and the effect of the taint, ignoring the value:
tolerations:
- key: "key1"
  operator: "Exists"
  effect: "NoSchedule"
(If you want to read more about taints and tolerations, please check the official doc!)
That said, this is our current situation:
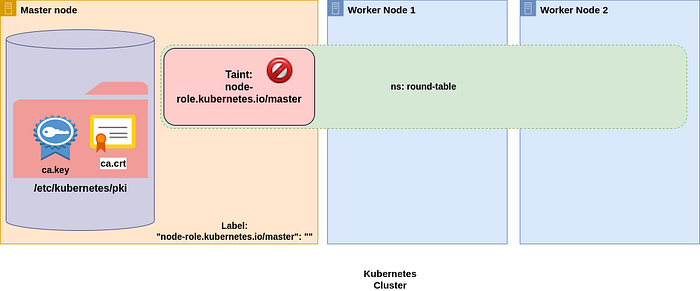
We couldn’t schedule our pod on the master node due to the taint: of course, nothing can stop us from tolerating that taint! We can go one step forward and apply a toleration for all possible taints, so we are sure we can schedule our pod everywhere! Just edit the deplyoment and add these 4 lines (you can find the full snippet here):
...
spec:
  tolerations:
  - key: ""
    operator: "Exists"
    effect: "NoSchedule"
  ...
This time the Pod will be scheduled onto the master node:

Stealing the ca key and certificate
Now that we have a process running on the master node, we can proceed with mounting the folder where we expect to find the ca.key and ca.crt, and instruct our container to log out their content.
To do this, we can use an hostPath Volume the same way the apiserver pod does it. Our final deployment may look something like this (I used a busybox image here):
If we look at the logs of the pod, we should see the sentitive data we are looking for:
kubectl logs busybox-...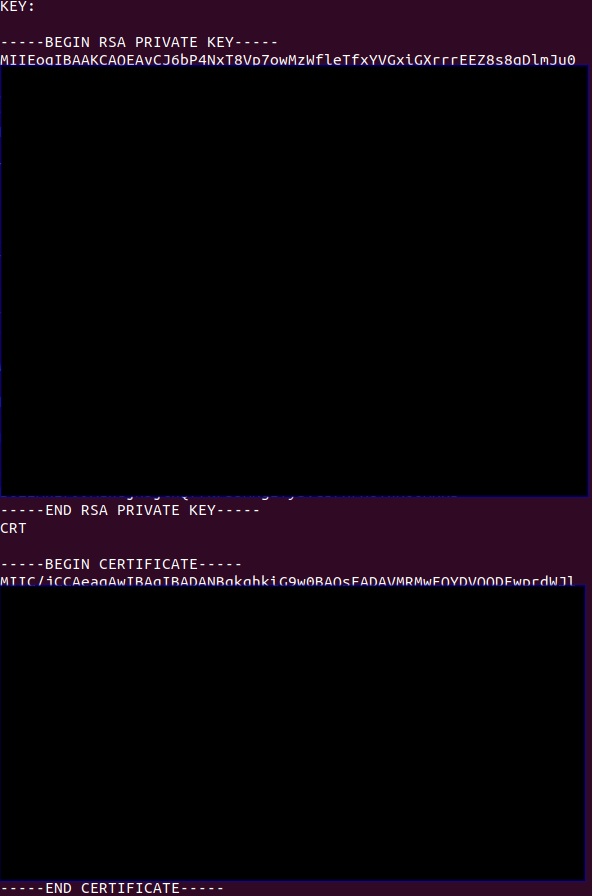
Generate credentials with admin rights
Now that we got possession of the ca key and certificate, we can store them somewhere on our machine and use them to generate a new certificate for the dragon exactly as we did in the first post of this series. You can do this as an exercise, anyway for the sake of completeness here is the code (I stored the stolen files on my machine as ca.key and ca.crt):
openssl genrsa -out dragon.key 2048
openssl req -new -key dragon.key -out dragon.csr -subj "/CN=dragon/O=system:masters"openssl x509 -req -in dragon.csr -CA ca.crt -CAkey ca.key -CAcreateserial -out dragon.crt -days 365
We can then add the new certificate into our kubeconfig and use it (please note that in the first post I named my cluster camelot, maybe your cluster has another name such as kubernetes!):
kubectl config set-credentials dragon --client-certificate=dragon.crt --client-key=dragon.key --embed-certskubectl config set-context dragon@camelot --user=dragon --cluster=camelotkubectl config use-context dragon@camelot
With this new context you can finally get rid of your developer restrictions and act on the cluster as an admin! For example:
kubectl auth can-i delete namespaces -A
> yes
A small improvement
In my GitHub repo you will find a small improvement of this attack, where you won’t even need to manually copy the stolen key and sign the CSR. In fact, if you run the script that you find there, the new credentials will be automatically added into your kubeconfig (and the context switched). There is a Terraform configuration as well: give it a try!
Recap
In this post, we have seen how easy it is to take control over a kubeadmin cluster even with a limited account. Indeed, all we had to do was to force the scheduler to start a pod on a master node and mount an hostPath volume: we magically got access to files (such as ca.key) which should be accessible just to root!
Our aim was to steal the ca.key and ca.crt to sign a new CSR granting us admin privileges, but we could have done much nastier things (i.e. we could have modified one of the control plane static pods — here an example)!
In general, when a user can create or edit pods / deployments, there are many other escalation paths to take into account!
I hope that after this reading you will agree with me that securing a k8s cluster means much more than just implementing AuthN and AuthZ!
If you are already CKA certified, I definitely suggest you to go for the CKS certification, where you’ll be introduced to Container and Kubernetes Security. Both Kodekloud’s and Kim Wüstkamp’s courses are worth every penny!
Whether you plan to get CKS certified or not, Liz Rice’s “Container Security” is a must read if you are interested to this topic:
In the next post, we will analyse the single steps of this attack and see which countermeasures can we adopt for each of them.

Join FAUN: Website 💻|Podcast 🎙️|Twitter 🐦|Facebook 👥|Instagram 📷|Facebook Group 🗣️|Linkedin Group 💬| Slack 📱|Cloud Native News 📰|More.
If this post was helpful, please click the clap 👏 button below a few times to show your support for the author 👇